|
|
Post by mtuser2012 on Sept 12, 2015 20:38:52 GMT
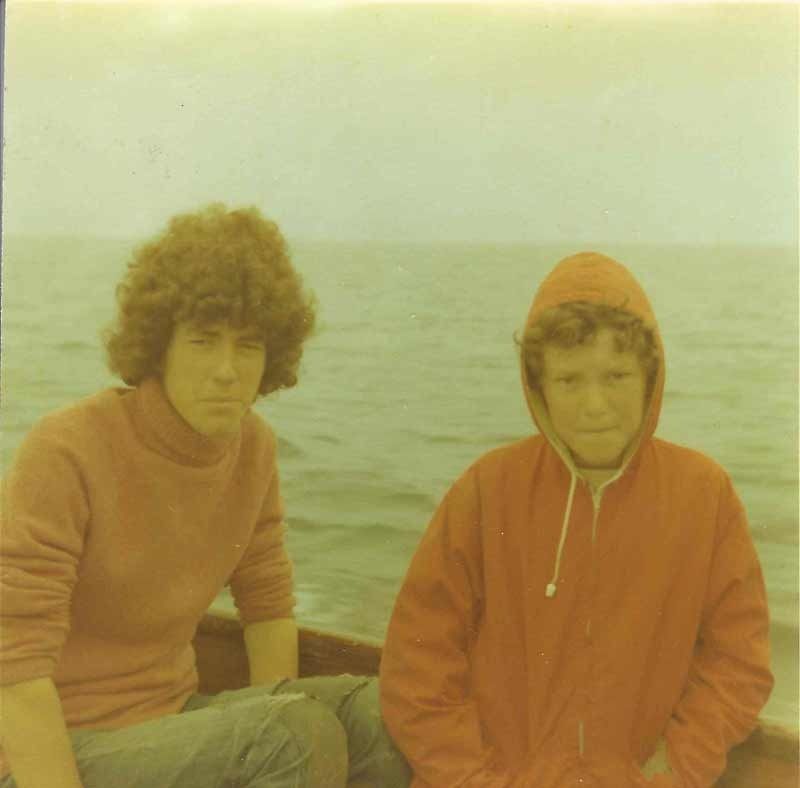
My mom recently died and my wife was helping my dad clean up. She found a few pictures of me when I was a child, so 40+ years ago. The color has faded and they have a tint in them. Please can I get advice on how to get them back to close to original? Now I have a son of my own, he is older than I was in the picture, and he is interested in seeing who I was, so that is another reason to try to fix these. All have the same fault. I am currently using PSE10, but would be willing to upgrade if there is good reason to do so.  |
|
|
|
Post by Sepiana on Sept 12, 2015 21:07:07 GMT
Hi mtuser, welcome to PSE&M! Sorry to hear about your mom.
Here are some instructions to remove color cast. I believe they were originally posted by Bayla back in EV. I find them quite effective.
1. Ctrl-J
2. Filter>Blur>Average. The image will turn to a solid colour.
3. Ctrl-L, then with the middle eyedropper selected click anywhere on the image - it will turn grey.
4. Delete this copy layer.
5. Alt>Ctrl>L to bring up the Levels dialogue box again & click OK. The colour cast will have disappeared.
Here is another way I use the Average Blur filter to remove color cast.
1. Duplicate the background layer.
2. Apply the Average Blur filter.
3. Change the layer blend mode to Color.
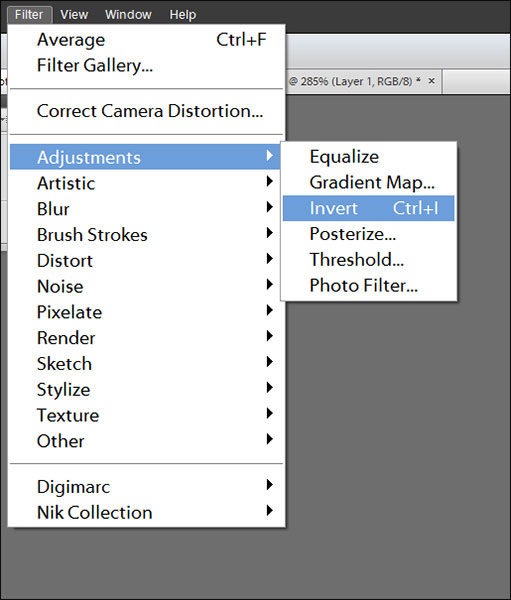
4. Invert the layer (Filter>Adjustments>Invert). Or use the shortcut -- Ctrl-I, Cmmd-I on a Mac.
5. Reduce the Opacity to about 50%.
EDIT: Here are two more possibilities -- the Remove Color Cast command (Enhance menu) and Levels.
The Remove Color Cast command works really well if your image has areas which should be black, white, or gray. On the other hand, if your image doesn’t have any areas which should be one of these colors, then, you should try something else. Another drawback of the Remove Color Cast command is that it doesn’t work with 16-bit images.
Levels will enable you to have more control because you can adjust individual color channels. The drawback is that sometimes Levels won’t do the job, especially if the color cast is too intense. Also, other times (because of the nature of the image) it may be difficult to find a neutral area on which to click with the Levels gray eyedropper. That's when you should use the Blur/Average filter mentioned above.. This filter will create a solid color which is the average of the colors in the image; this solid color is the tint of the color cast. When you click on this layer with the gray eyedropper, all color will get removed from it. Now the Levels algorithm has a gray image to calculate the necessary adjustments. Surprisingly, most of the time this filter is right on the mark.
|
|
|
|
Post by mtuser2012 on Sept 12, 2015 22:06:24 GMT
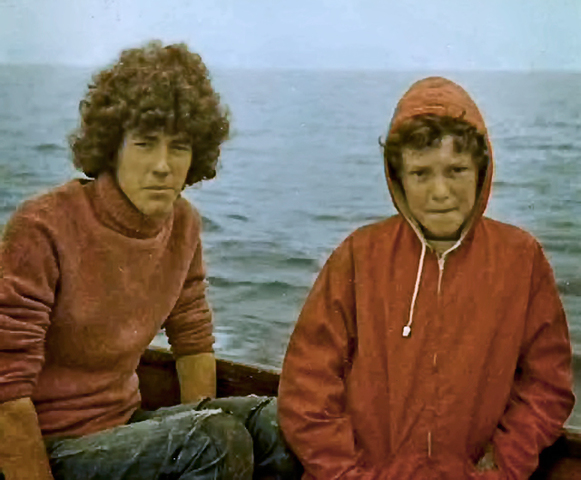
Thank you. Your instructions worked great to remove the cast. The photo looks washed out now, the colors aren't quite right. Do you have any suggestions on how to further improve it?  |
|
Squirrel2014
Established Forum Member
  Where's that cup of tea ... ???
Posts: 685  Open to constructive criticism of photos: Yes
|
Post by Squirrel2014 on Sept 12, 2015 22:07:15 GMT
Hi mtuser, my condolences re losing your mother recenlty. Thanks for bringing up this question as I have the same type of problem with many old photos that have faded, got strong yellowy tints etc too. It's good to learn how to rectify this and so preserve them for yet longer. Your son will love to see what you looked like at around his age - always a fascinating topic.
Sepiana, I followed your first set of instructions without problem and the final outcome was a much better image colour. However, I couldn't work your second set of instructions. All was fine for point 1, 2 and 3 but when I inverted the layer (point 4) the image went sort of blue'ish 'negative' and asI brought the opacity down the image just went grey. Clearly I have missed something but I can't see what. I've tried this a few times, all with the same grey square result. Please advise ...
Many thanks
Julie
|
|
|
|
Post by mtuser2012 on Sept 12, 2015 22:12:23 GMT
PS. Thanks for the explanation too. And I remember you from EV. You helped me there too. Thanks.
|
|
Squirrel2014
Established Forum Member
  Where's that cup of tea ... ???
Posts: 685  Open to constructive criticism of photos: Yes
|
Post by Squirrel2014 on Sept 12, 2015 23:24:27 GMT
Hi mtuser, I have been playing around with an image using Sepiana's first set of instructions. After getting rid of the cast, I have found Levels to be the best way to correct the washed-out' look. As well as experimenting with RGB channel, I have experimented with the specific colour channels and tried to bring back some vibrancy in the colour. I have to say, I feel I've achieved some very acceptable results. Have a play around in the Levels window  Good luck Julie |
|
|
|
Post by Sepiana on Sept 13, 2015 1:25:51 GMT
Thank you. Your instructions worked great to remove the cast. The photo looks washed out now, the colors aren't quite right. Do you have any suggestions on how to further improve it You are most welcome!
There is more than one way to make the colors pop in an image. See which one of these techniques will work best for your image.
- Duplicate the background layer. Change the blending mode to Multiply. If the results are too intense, lower down the opacity.
- Do a Levels adjustment.
- Do a Hue/Saturation adjustment.
|
|
|
|
Post by Sepiana on Sept 13, 2015 1:47:23 GMT
Sepiana, I followed your first set of instructions without problem and the final outcome was a much better image colour. However, I couldn't work your second set of instructions. All was fine for point 1, 2 and 3 but when I inverted the layer (point 4) the image went sort of blue'ish 'negative' and asI brought the opacity down the image just went grey. Clearly I have missed something but I can't see what. I've tried this a few times, all with the same grey square result. Please advise ... I am not sure what is going on. I have used these instructions before; they work. As a matter of fact, I tested them again just before I posted them and everything was fine. Usually lowering down the opacity to 50% or so will remove the color cast. Then, if needed, you can do some adjustment (Levels, H/S, etc.)
As a side note -- I was able to track down these instructions. They came from Barbara Brundage's The Missing Manual. In the Adding Fun and Useful Effects chapter, she says:
|
|
Squirrel2014
Established Forum Member
  Where's that cup of tea ... ???
Posts: 685  Open to constructive criticism of photos: Yes
|
Post by Squirrel2014 on Sept 13, 2015 17:53:55 GMT
Hi Sepiana Many thanks. I appreciate the time and effort you give to questions etc. I've just been experimenting re the 2nd instructions. In v13, on Invert, the image looks like a blue negative and reducing the opacity doesn't achieve the required results. So, I tried exactly the same in v12 but got exactly the same result. However, having discovered the keyboard shortcut, Ctrl + I for Invert, I tried that and, strangely enough, this resulted in a blue'ish image which, when opacity was reduced, the colours came through, even though rather washed out. I then used Adjustment Layers and Levels and was able to achieve a very good colour, of which I am very pleased with. Is there a difference between clicking on the Adjustment Layer icon and selecting 'Color' vs using the keyboard shortcut of Ctrl + I ? It has clearly made a whole big difference in my experimenting so, clearly, there is a difference, even if only on my PC  I'll try this on my laptop (Win 10) and see what results I can get (using v12, as I haven't yet installed v13 onto my laptop yet) |
|
|
|
Post by fotofrank on Sept 13, 2015 18:40:40 GMT
 You may want to try a blendmode of overlay or softlight. |
|
|
|
Post by Sepiana on Sept 13, 2015 19:03:33 GMT
I've just been experimenting re the 2nd instructions. In v13, on Invert, the image looks like a blue negative and reducing the opacity doesn't achieve the required results. So, I tried exactly the same in v12 but got exactly the same result. However, having discovered the keyboard shortcut, Ctrl + I for Invert, I tried that and, strangely enough, this resulted in a blue'ish image which, when opacity was reduced, the colours came through, even though rather washed out. I then used Adjustment Layers and Levels and was able to achieve a very good colour, of which I am very pleased with. Is there a difference between clicking on the Adjustment Layer icon and selecting 'Color' vs using the keyboard shortcut of Ctrl + I ? It has clearly made a whole big difference in my experimenting so, clearly, there is a difference, even if only on my PC  I'll try this on my laptop (Win 10) and see what results I can get (using v12, as I haven't yet installed v13 onto my laptop yet)
This difference in results has nothing to do with which version of Elements you are using and/or which OS.
Yes, using an Invert Adjustment layer will make your photo look like a negative, which is very useful in applying artistic effects to photos. However, in this case, we are trying to remove a color cast. It is when the Invert filter (Ctrl-I, Cmmd-I on a Mac) comes into play; the Invert filter inverts the layer's colors. There is another filter, the Photo Filter, which can be used to remove color casts. In the second set of instructions, what we are doing is using the Average Blur filter to create a customized Photo Filter, one which is especially toned for the image in question. The secret "ingredient" is changing the layer blending mode to Color.

I am sorry for the confusion. I should have added more details in the second set of instructions. I will do it now.
|
|
Squirrel2014
Established Forum Member
  Where's that cup of tea ... ???
Posts: 685  Open to constructive criticism of photos: Yes
|
Post by Squirrel2014 on Sept 13, 2015 19:20:28 GMT
Thanks Sepiana I was using the Adjustments menu for Invert so, according to your explanation, that would be the reason I kept getting a blue'ish negative and it didn't work. Then, for some reason, I tried Ctrl + I (mere guess work as I like keyboard shortcuts) and, my miracle, it worked. I was so confused and wondered what the difference between using the shortcut re using Invert on the Adjustments menu. So, really pleased that's now identified and explainable etc. Thank you so much for this. I'll be able to get on with sorting my old photos that look terrible with age with colour casts!  Again, thank you so much. Sorry I'm such a pain in the neck  I admire your patience  Julie |
|
|
|
Post by Sepiana on Sept 13, 2015 19:25:17 GMT
Thank you. Your instructions worked great to remove the cast. The photo looks washed out now, the colors aren't quite right. Do you have any suggestions on how to further improve it?
Going back to this question -- I thought of something else; I should have mentioned it my previous post.
You could use Curves (called Color Curves in Elements) to adjust the colors in your photos. It works much like Levels but it gives you more points of correction. This feature is accessed via Enhance>Adjust Color>Adjust Color Curves. Bonus? It works with 16-bit images.
helpx.adobe.com/photoshop-elements/using/correcting-color-casts.html#adjust_color_curves
|
|
|
|
Post by Tpgettys on Sept 13, 2015 19:36:46 GMT
 You may want to try a blendmode of overlay or softlight. WOW Frank! I am thunderstruck by how far you were able to restore this image! |
|
|
|
Post by hmca on Sept 13, 2015 20:26:45 GMT
I agree. Great job, Frank. I am sure the OP will be very pleased.
|
|